Nov 212014
 

As a confirmed topdown sweater knitter, I’ve embraced raglan, seamless set-in, and contiguous sleeve constructions that begin with a cast on at the top. My latest favorite adds the simultaneously worked sleeve to the seamless, set-in method. It’s a nifty way to create that tailored set-in sleeve look, without having to pick up stitches for the sleeve cap from the armhole and then work short rows, or knit the sleeve separately and seam it into the armhole. Mind you, I love a good short row sleeve cap. It’s just nice to have additional techniques available for when you feel like a change, or have a technical need such as an easy way to make perfectly matched stripes around the upper body and sleeves of a sweater.

Simultaneous sleeves are a variation of the seamless topdown sweater method. In that method, you cast on stitches for the back shoulders and neck, and work (often with a tiny bit of short row shoulder shaping) to the armscye depth. Then you pick up stitches from each back shoulder and work the right & left fronts to the identical depth, including neck shaping and any shoulder shaping. Typically the body front & back are then joined and worked to the hem; the sleeves are added afterwards by picking up stitches around the armhole, working a short row sleeve cap, then joining and finishing the sleeve in the round.

The simultaneous sleeve element alters this method in that you only work the back stitches, and the right & left front stitches, until there is enough depth to form the top of the sleeve caps, perhaps 2 or 3″ total depending on the style. Then both fronts and the back are united by picking up stitches for the sleeve caps along the edge rows, and the body is worked in one piece to the armscye depth where the sleeves are divided. In addition to the neck shaping and armhole shaping that occurs on the body, the sleeve cap is also shaped with increases at the same time – so there’s A LOT going on, which makes it fun.

This diagram shows a pullover, viewed from the top:
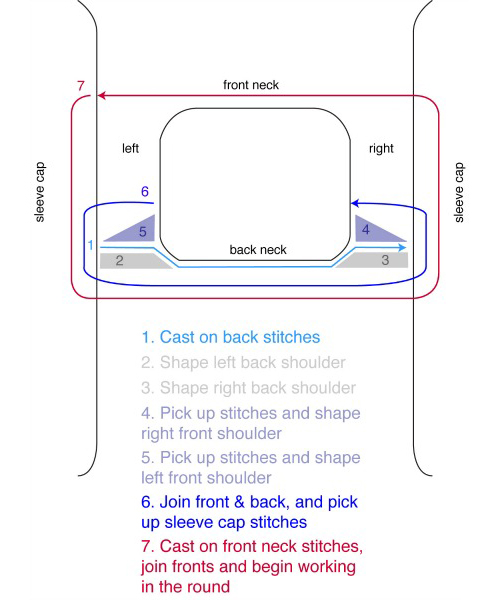
Seamless Simultaneous Setin Sleeve tutorial | The Knitting Vortex

It does take some planning to fit in everything that happens together – rapid sleeve cap increases to round the top of the sleeve, neck shaping at whatever rate is necessary to create a round, scoop or v-neck, and finally increases on the body to shape the armscye such that the front and back meet under the arm. The maths can all be done separately, but then have to be enacted at the same time while knitting. Working a sweater for yourself in one size is fairly straightforward; more challenging is writing a pattern in multiple sizes, where the rate of shaping differs among the sizes.

I decided to approach the issue by addressing each section of shaping one rate at a time; for example, I’ll say “Increase Sleeves Every Row,” then “Increase Sleeves Every Other Row,” then “Increase Sleeves & Front Neckline Every RS Row,” then “Increase Sleeves Every RS Row & Front Neckline Every Row,” writing out the instruction while telling you how many times to do it. It’s clear and walks you through the upper bodice step by step, which is helpful both if this construction is unfamiliar, and if you’d rather not set up your own spreadsheet for keeping track of multiple shaping at the same time.

My first Seamless, Simultaneous, Set-in Sleeve Sweater is almost ready for release, and my goal has been to make an easy to understand pattern for this excellent construction method. The sweater itself, and the fit of the set-in sleeves, came out great!
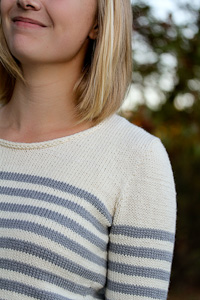
Elizabel shoulder detail | The Knitting Vortex

Nov 182014
 

Grafting Garter Tutorial | The Knitting Vortex

In addition to my Grafting Stockinette Stitch tutorial, I thought it would be helpful to demonstrate grafting in garter stitch; the live stitches of two pieces of garter fabric can be joined seamlessly and invisibly just as easily. You’ll need the live stitches divided equally on on two separate needles, a yarn needle, and a length of yarn at least 2 times the length of the finished seam – either a separate piece of yarn, or even better, the yarn tail from the last row.

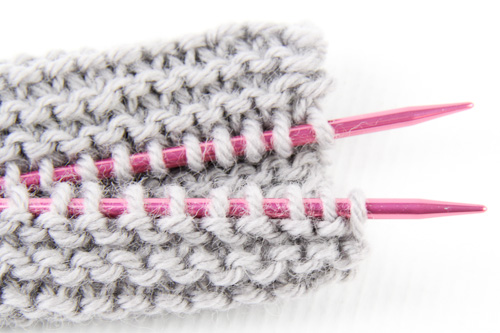
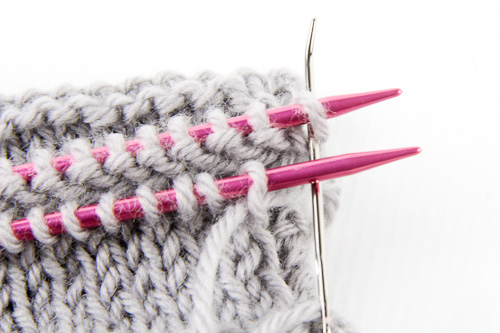
Hold the needles parallel, with WS (in this case, the private side of the work) facing together. Make sure both have the same number of stitches, and that there are purl bumps snug up against the front needle, and knit stitches against the back needle, as viewed from the outer, public sides.

Grafting Garter prep | The Knitting Vortex

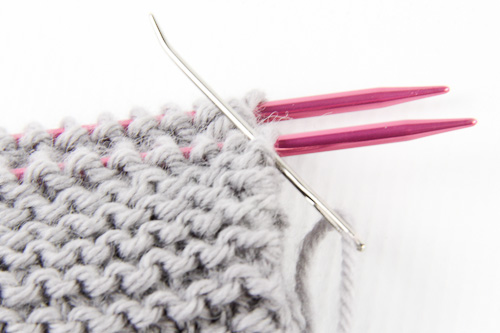
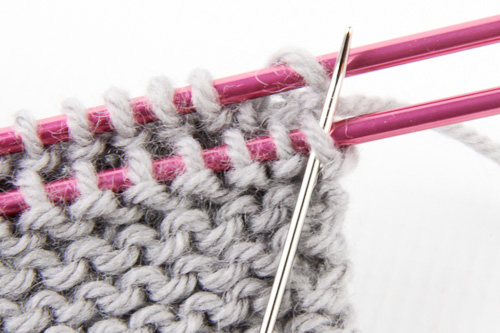
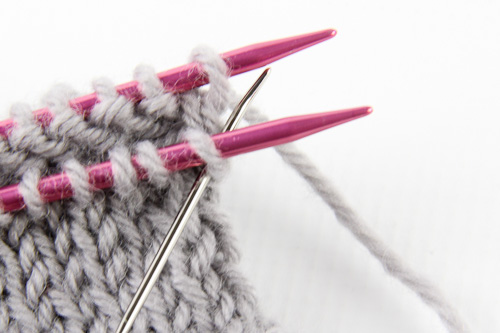
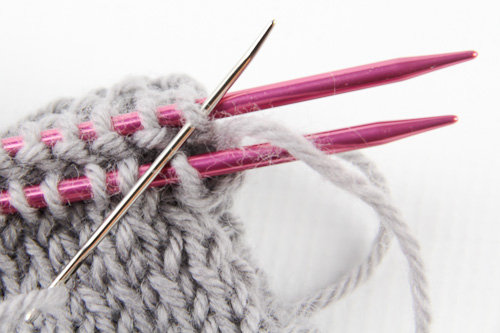
Setup 1 – insert yarn needle into the first stitch on the front needle purlwise, leaving the stitch on the needle:

Grafting Garter setup1 | The Knitting Vortex

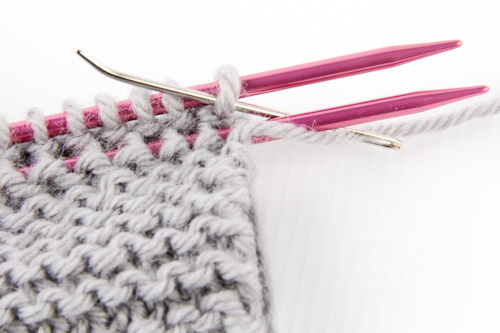
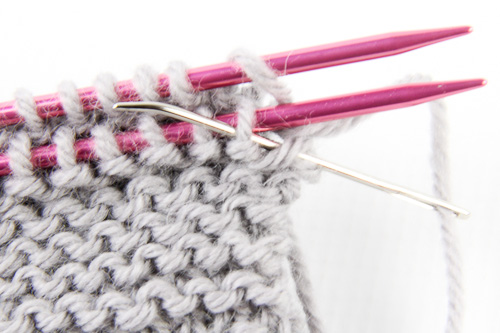
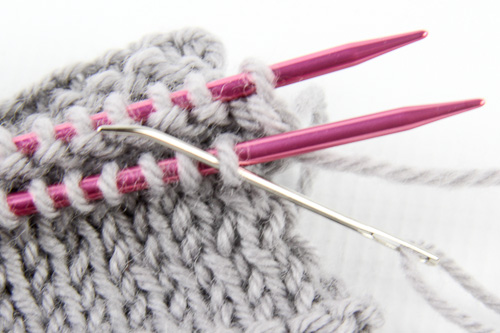
Setup 2 – insert yarn needle into the first stitch on the back needle purlwise, leaving the stitch on the needle:

Grafting Garter setup2 | The Knitting Vortex

The two setup steps are worked only once. Pull the yarn gently through the stitches, making sure it travels underneath the needle tips, never over them.

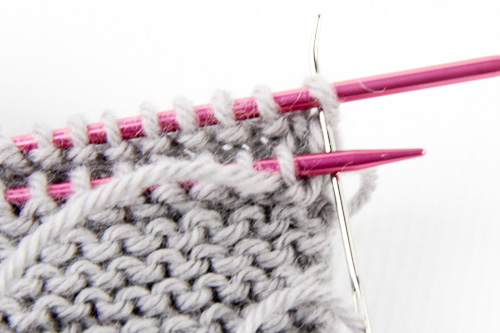
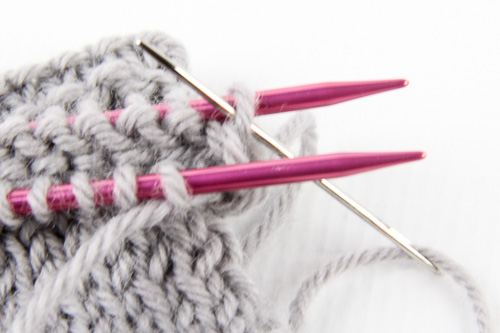
1. Insert yarn needle into the first stitch on the front needle knitwise, and slip the stitch off the needle:

Grafting Garter 1 | The Knitting Vortex

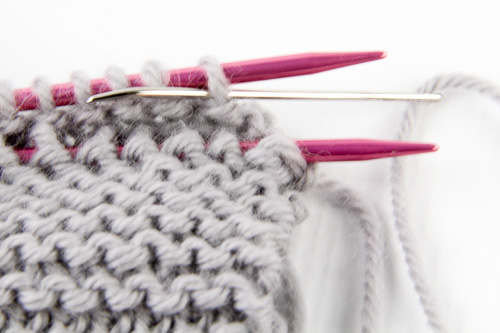
2. Insert yarn needle into next stitch on the front needle purlwise, leaving the stitch on the needle:

Grafting Garter 2 | The Knitting Vortex

3. Insert yarn needle into the first stitch on the back needle knitwise, and slip the stitch off the needle:

Grafting Garter 3 | The Knitting Vortex

4. Insert yarn needle into next stitch on the back needle purlwise, leaving the stitch on the needle:

Grafting Garter 4 | The Knitting Vortex

Repeat steps 1-4 until only 1 stitch remains on each front and back needle, then repeat steps 1 and 3. As you work, pull the yarn gently through the stitches, stopping every so often to adjust the graft by pulling on the grafting yarn. A loose tension can be tightened up stitch by stitch at the end, but pulling too tightly will cause the fabric to distort. Graft all the stitches, adjust the tension as needed and then block to enjoy your seamless join.

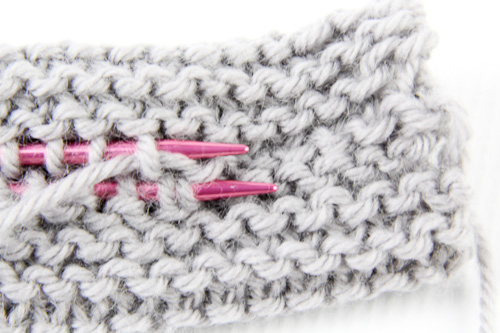
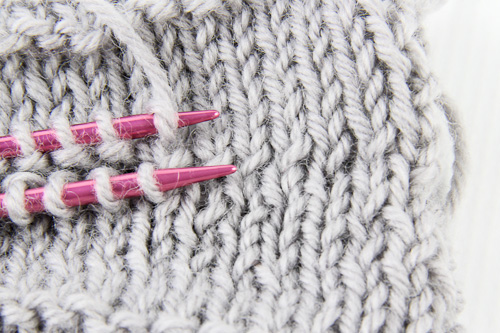
Grafting Garter finished seam | The Knitting Vortex

Tutorial: Grafting Stockinette Stitch

 Tutorials  Comments Off on Tutorial: Grafting Stockinette Stitch
Nov 172014


Grafting Stockinette Tutorial | The Knitting Vortex

Grafting, or Kitchener Stitch, is a way to join the live stitches of two pieces of knit fabric so that there’s no visible seam. It can be employed instead of sewing or the 3-needle bind off, in all sorts of helpful situations such as shoulder or underarm seams, or an infinity scarf. You’ll need the live stitches divided equally on on two separate needles, a yarn needle, and a length of yarn at least 2 times the length of the finished seam – either a separate piece of yarn, or even better, the yarn tail from the last row.

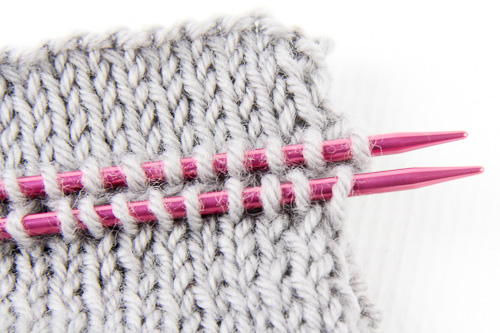
Hold the needles parallel, with WS facing together; doublecheck to make sure both have the same number of stitches:

Grafting Stockinette prep | The Knitting Vortex

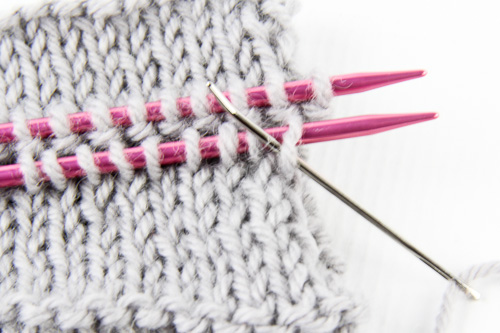
Setup 1 – insert yarn needle into the first stitch on the front needle purlwise, leaving the stitch on the needle:

Grafting Stockinette setup1 | The Knitting Vortex

Setup 2 – insert yarn needle into the first stitch on the back needle knitwise, leaving the stitch on the needle:

Grafting Stockinette setup2 | The Knitting Vortex

The two setup steps are worked only once. Pull the yarn gently through the stitches, making sure it travels underneath the needle tips, never over them.

1. Insert yarn needle into the first stitch on the front needle knitwise, and slip the stitch off the needle:

Grafting Stockinette 1 | The Knitting Vortex

2. Insert yarn needle into next stitch on the front needle purlwise, leaving the stitch on the needle:

Grafting Stockinette 2 | The Knitting Vortex

3. Insert yarn needle into the first stitch on the back needle purlwise, and slip the stitch off the needle:

Grafting Stockinette 3 | The Knitting Vortex

4. Insert yarn needle into next stitch on the back needle knitwise, leaving the stitch on the needle:

Grafting Stockinette 4 |The Knitting Vortex

Repeat steps 1-4 until only 1 stitch remains on each front and back needle, then repeat steps 1 and 3. As you work, pull the yarn gently through the stitches, stopping every so often to adjust the graft by pulling on the grafting yarn. A loose tension can be tightened up stitch by stitch at the end, but pulling too tightly will cause the fabric to distort. Graft all the stitches, adjust the tension as needed and then block to enjoy your seamless join.

Grafting Stockinette finished seam | The Knitting Vortex

If you need to graft garter stitch, it’s even simpler; my Grafting Garter Tutorial takes you through the steps.

Indie Design Gift-A-Long 2014

 Patterns  Comments Off on Indie Design Gift-A-Long 2014
Nov 142014
 

Indie Design Gift-A-Long 2014 | The Knitting Vortex

Back this year and better than ever, the Indie Design Gift-A-Long is a 2 month craft-a-long of holiday gifts made from patterns designed by a fabulous group of independent designers on Ravelry. The event runs from November 13 to the New Year’s Eve party on December 31, with fiber fun, endless chatter and prizes. We kick off with a special 25% sale from Thursday, November 13th at 8:00 pm US EST – Friday, November 21, 2014 at 11:59 pm US EST. Each designer is offering from 4-20 of their patterns handpicked especially for holiday crafting for this promotion; use coupon code giftalong2014 at the Ravelry checkout.

My 20 special sale patterns are bundled on Ravelry for easy perusing, and include favorite shawls both new and old, cold weather accessories, and some woolly sweaters:

Giftalong bundle sale patterns 2014 | The Knitting Vortex

You can join the fun with any of the participating designer’s indie patterns, and there are A LOT of them – 293 designers from 21 countries with over 11,500 patterns. that’s enough to keep busy ’til Christmas.

To see my indie patterns, check out my Ravelry designer page, The Knitting Vortex – Designs by Jennifer Dassau. Happy Knitting, Happy Gifting!


Vary

 Featured, New Release, Wraps  Comments Off on Vary
Nov 032014
 

vary: to change periodically or in succession; differ or alternate

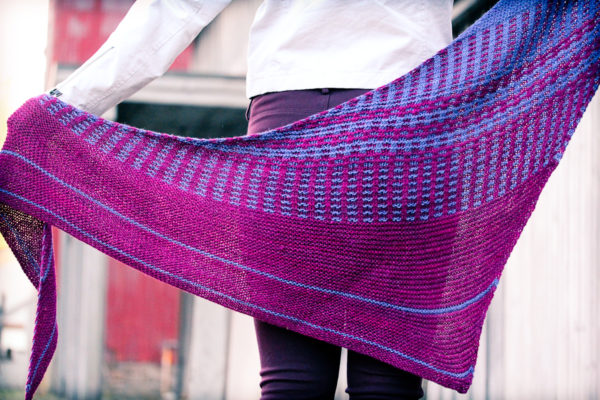
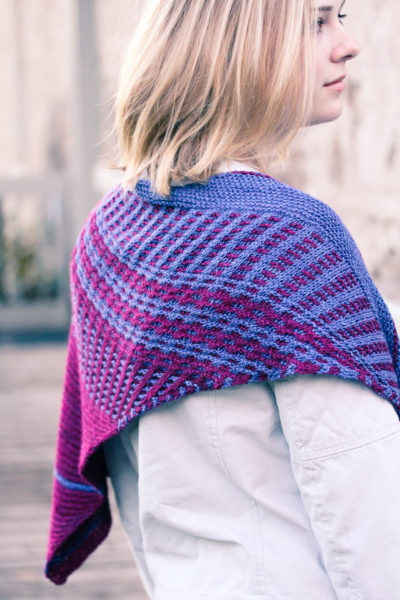
An asymmetric shawl that combines various patterns, this bias wrap moves from simple garter stripes through slipstitch colorwork and back again. Cast on at the long, narrow end, Vary grows on the bias, only ever using one color at a time in each row. Choose two colors or even more, and make it your own by varying the placement of the different stitch patterns; the simple construction adapts easily to different amounts of yardage and to your artistic vision.

Techniques & Skills Used: knit/purl, increasing/decreasing, slipstitch colorwork; the slipstitch pattern instructions are fully written only.

Size: 105” length and 21” depth, customizable.

Yarn: String Theory Hand Dyed Yarn Selku (50% silk, 50% merino wool; 375 yards/343m/113g), shown in Viola (MC) and Juice (CC); 1 skein MC and 1 skein CC. The sample used about 340 and 370 yards respectively.

Other Materials: US 7 (4.5mm) 32” circular needle or size to match gauge; Yarn needle.

Gauge: 15 st and 30 rows/4” in garter stitch, after blocking. Gauge is not critical for this project, however a different gauge may result in a smaller or larger finished shawl, and different yardage requirements.

See it on Ravelry or on Payhip, to read more or purchase the pattern.