Nov 212014
 
Tutorial: Seamless Simultaneous Set-in Sleeves

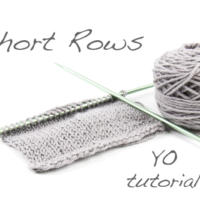
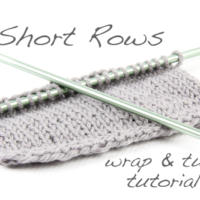
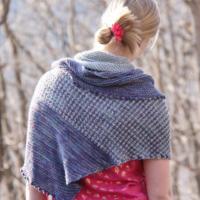
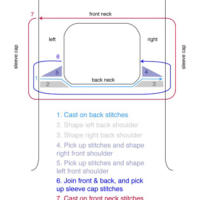
As a confirmed topdown sweater knitter, I’ve embraced raglan, seamless set-in, and contiguous sleeve constructions that begin with a cast on at the top. My latest favorite adds the simultaneously worked sleeve to the seamless, set-in method. It’s a nifty way to create that tailored set-in sleeve look, without having to pick up stitches for the sleeve cap from the armhole and then work short rows, or knit the sleeve separately and seam it into the armhole. Mind you, I love a good short row sleeve cap. It’s just nice to have additional techniques available for when you feel like a change, or have a technical need such as an easy way to make perfectly matched stripes around the upper body and sleeves of a sweater. Simultaneous sleeves are a variation of the seamless topdown sweater method. In that method, you cast on stitches for the back shoulders and neck, and work (often with a tiny bit of short row shoulder shaping) to the armscye depth. Then you pick up stitches from each back shoulder . . .

Nov 182014
 
Tutorial: Grafting Garter Stitch

In addition to my Grafting Stockinette Stitch tutorial, I thought it would be helpful to demonstrate grafting in garter stitch; the live stitches of two pieces of garter fabric can be joined seamlessly and invisibly just as easily. You’ll need the live stitches divided equally on on two separate needles, a yarn needle, and a length of yarn at least 2 times the length of the finished seam – either a separate piece of yarn, or even better, the yarn tail from the last row. Hold the needles parallel, with WS (in this case, the private side of the work) facing together. Make sure both have the same number of stitches, and that there are purl bumps snug up against the front needle, and knit stitches against the back needle, as viewed from the outer, public sides. Setup 1 – insert yarn needle into the first stitch on the front needle purlwise, leaving the stitch on the needle: Setup 2 – insert yarn needle into the first stitch on the back needle purlwise, leaving the . . .

Tutorial: Grafting Stockinette Stitch

 Tutorials  Comments Off on Tutorial: Grafting Stockinette Stitch
Nov 172014
 
Tutorial: Grafting Stockinette Stitch

  Grafting, or Kitchener Stitch, is a way to join the live stitches of two pieces of knit fabric so that there’s no visible seam. It can be employed instead of sewing or the 3-needle bind off, in all sorts of helpful situations such as shoulder or underarm seams, or an infinity scarf. You’ll need the live stitches divided equally on on two separate needles, a yarn needle, and a length of yarn at least 2 times the length of the finished seam – either a separate piece of yarn, or even better, the yarn tail from the last row. Hold the needles parallel, with WS facing together; doublecheck to make sure both have the same number of stitches: Setup 1 – insert yarn needle into the first stitch on the front needle purlwise, leaving the stitch on the needle: Setup 2 – insert yarn needle into the first stitch on the back needle knitwise, leaving the stitch on the needle: The two setup steps are worked only once. Pull the yarn gently through the . . .

Sep 092014
 
Tutorial: Short Rows using the Shadow Wrap method

The final post in my series of tutorials for working Short Rows demonstrates the Shadow Wrap method, promulgated by Socktopus. As in the German and Japanese methods, an extra loop is made from the row below to disguise the turning point; the extra loop in this case is a stitch worked into the stitch below just before turning, creating a twinned stitch at the turning point. Later both loops of the twinned stitch are worked together to close the gap. The Shadow Wrap method on a knit row: 1. Knit to the turning point, then knit into the stitch below the next stitch on the left needle, creating a twinned stitch. 2. Slip this twinned stitch to the left needle without twisting it. 3. Turn the work, and purl the next row. The Shadow Wrap method on a purl row: 1. Purl to the turning point, then slip the next stitch purlwise to the right needle. 2. Insert the left needle tip into the stitch below the slipped stitch on the right needle, lifting the . . .

Tutorial: Short Rows using the Japanese method

 Tutorials  Comments Off on Tutorial: Short Rows using the Japanese method
Sep 052014
 
Tutorial: Short Rows using the Japanese method

The fourth in my series of tutorials for working Short Rows demonstrates the Japanese method. As in the German method, an extra loop is pulled up from below to disguise the turning point; instead of pulling it up with a YO, the working yarn is marked when the work is turned and later pulled up to create the extra loop at the time of closing the gap. This method requires a removable stitch marker, bobby pin or scrap yarn to mark the loop to be pulled up. The Japanese method on a knit row: 1. Knit to the turning point, and turn the work; slip the next stitch purlwise. 2. Place a removable stitch marker on the working yarn at the front of the work. 3. Purl the next row as needed. The Japanese method on a purl row: 1. Purl to the turning point, and turn the work; slip the next stitch purlwise. 2. Place a removable stitch marker on the working yarn at the back of the work; knit the next row as . . .

Tutorial: Short Rows using the German method

 Tutorials  Comments Off on Tutorial: Short Rows using the German method
Sep 022014
 
Tutorial: Short Rows using the German method

The third in my series of tutorials for working Short Rows demonstrates the German method; this is another technique which uses a yarnover instead of wrapping the turning stitch, but instead of the yarnover itself becoming the extra loop, it’s used to pull up a stitch from below to disguise the turning point. The German method on a knit row: 1. Knit to the turning point, and turn the work. Note that when using this method, you will work up to and including the turning stitch. In the w&t method, you’re technically working to one stitch before the turning stitch. 2. Slip the next stitch purlwise. 3. Bring the working yarn to the back over the right needle, and pull upwards so that the stitch below the slipped stitch is pulled partially up onto the needle. This creates what appears to be an odd-looking double stitch, but it’s not a mistake. 4. Bring the working yarn to the front again between the needles; purl the next row. The German method on a purl row: 1. . . .

Aug 282014
 
Tutorial: Short Rows using the yarnover method

The second in my series of tutorials for working Short Rows demonstrates the yarnover method; this technique uses a backwards yarnover instead of wrapping the turning stitch, and then works that extra loop to disguise the turning point. To yarnover on a knit row: 1. Knit to the turning point, and turn the work. 2. Make a backwards YO by bringing the yarn to the back between the needles . . . 3 .  . . . and then over the right needle to the front again; purl the next row. Purling that first stitch may be a bit fiddly with the yarnover coming over the needle, but it helps to hold it in place with your finger. To yarnover on a purl row: 1. Purl to the turning point, and turn the work. 2. Make a backwards YO by bringing the yarn to the front between the needles . . . 3.  . . . and then over the right needle to the back again; knit the next row. To work the yarnover on . . .

Tutorial: Short Rows using the wrap & turn method

 Tutorials  Comments Off on Tutorial: Short Rows using the wrap & turn method
Jul 132014
 
Tutorial: Short Rows using the wrap & turn method

Short Rows are one of my very favorite knitting things, ever. Need to shape a hem, make a bust dart or a shoulder slope? No seaming, no binding off, no problem – just work short rows and you can have angled sections of knitting that create shape and make a garment better fitting, or a shawl more interesting. There are many ways to work short rows, all of which involve working a partial row (thus, the “short”) and then using one of several methods to turn the work and go back in the opposite direction, while making the turning point unobtrusive and attractive. Perhaps the most common and basic is the wrap & turn method, sometimes abbreviated to w&t. To work it, here’s what you have to do: To w&t on a knit row: 1. Knit to the turning point; with yarn in back, insert the right needle tip purlwise into the next st, and slip it to the right needle. 2. Bring the yarn to the front. 3. Slip the wrapped st back to . . .

Apr 262014
 
Tutorial: how much yarn for the bind-off row?

I like to use every last bit of my yarn whenever possible; it both appeals to my frugal side, and justifies the purchase of new stash, since I’m using what I have so wisely. My ideal shawl is one like Sundry, where you can knit until you run out of yarn, leaving only enough for the bind off. I also find myself eking out sweaters with slightly-too-little yardage, by saving the sleeve cuffs for last (even after finishing!) and working both simultaneously until zero yarn remains. That still means you have to make sure you actually have enough so that you don’t get a dozen stitches from a completed bind off with 1″ of yarn remaining – one of a knitter’s most painful moments. There are several ways you can estimate how much to leave, in order to maximize your yardage. 1. The rule of thumb is to leave about 3 times the length of the row, or approximately 1″ of yarn per stitch. These guesstimates can both be done quickly, and you can choose . . .